
Getting Ready to Whelp
There are lots of sites with good information on breeding and whelping. There are also lots of sites with goofy information on this topic. Since now, May 17th, 2020, we are at the 7 week mark I thought I’d share a bit about what we have been through while we are getting ready to whelp. Since I still had my questions as to Hanani’s pregnancy, which I covered in a previous post, I did some more deep diving on the Web and found others–with more recent experience and with Shepherds in particular–had similar concerns. One lady posted a photo of her 7 week pregnant German Shepherd who did not appear to be showing at all! So, my concerns at bay, I figured we better get ready as best we can. Let’s talk about the supplies that are needed and how important these things are.
Whelping packages
While I sought for supplies to get ready for that special day, I came across some seemingly nifty packages on Amazon. These purport to have all things any person would need to help their dog bring these wee ones in the world safely. Problem is, all the packs I found had unnecessary things and left out the things I was looking for. I mean, they may work for some, but not this gal 😉 Check them out for yourself here…

This package is for expecting up to 8 puppies and is almost $35, not including shipping. It comes with charts to document each pup’s growth and disposable pads were along with other items I really do not need. After all, cloth rags are more absorbent and easier to use, and can be thrown away just as simply. But I really like the idea of the tiny, adjustable bands that are super soft, but durable. For me, this beats finding many different colors of ribbon to tie around their little necks!
Truly it is up to you. Go with the pre-packaged kits (that do not even include hemostats (clamps) or surgical scissors), or keep reading to see what I put together.
My kit
I am of the mind that it is best to have what might be needed on hand, “just in case”, rather than to need something and not have it. Seriously. What if, God forbid, something happens to Hanani and she cannot nurse the new pups? So, I bought bottles. There are lots of great pet nursers, but I bought some small, regular baby bottles with nipples for preemie babies so I did not have to buy larger bottles later. Just in case, of course 😉 Also, what if she needs help with the cords? So, I bought hemostats (2) and some surgical scissors.
Now, since my husband is a PA (physician assistant), he was a bit unsettled that I did not ask him about the stuff he had first. But hey… Now we have two pairs of surgical scissors. How bad can that be?
Anyway… Here’s what I put together: 
- 2 bulb syringes (to clear nose and mouth)
- Chew-proof bandage (just in case, plus it’s cool)
- Hibicleanse (alternative to iodine, to clean if necessary)
- Evenflo bottles with preemie nipples
- 18 rags
- surgical scissors
- hemostats (2)
- ID collars, 15 colors
- heating pad (not pictured)
- scales (not pictured)
Now, sure. We are going to need scads of blankets. But we have those, and as they get messy we can either wash them (if they’re salvageable) or toss them. No biggie. The last piece we’re still waiting for is the heating pad. Since puppies cannot regulate their own temperature, it is a wise idea to have one.
The scales (yes, that is plural) are needed to keep track of the puppies’ weight, to make sure they are thriving and growing well. I bought two scales: One digital food scale (for measuring in ounces), and one regular digital scale. I figured it’s best to be practical and frugal. These two scales still cost less than one baby scale or one special made for dogs/pups. And, we can use them for other things later.
Whelping box
Here is another thing I drove myself nuts about: The whelping box. I saw everything from high-priced, custom made boxes, DIY wood boxes, to someone using a kiddie pool as I pondered this. We have a unique situation in that my girls have their own room. We took the door off one of our four bedrooms (the one right across from our room, of course!) and replaced it with a gate. Then, my gosh… I can be so silly. I made name plaques, painted it really pretty and decorated with cool posters and paw-print stickers! All that to say, I do not want a huge, clunky wood box in the upstairs of my house, taking up all that space in the girls’ room. But I wasn’t sure about the kiddie pool thing. Where to store it? Gosh…
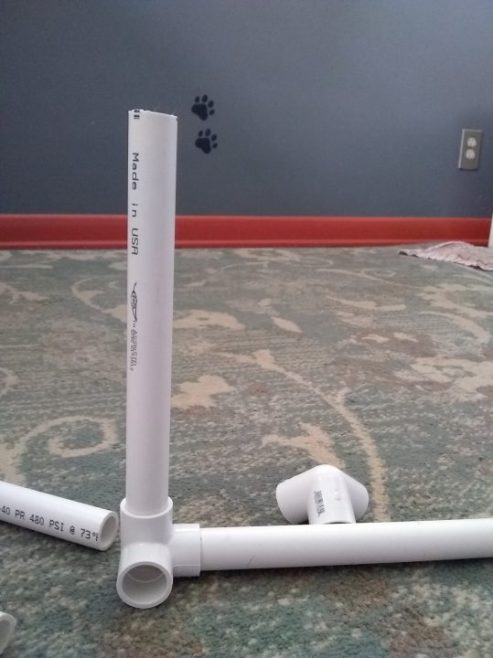
I love times like these because it forces my creative mind to grow. The following photos will show you step-by-step how to build a fully washable and entirely portable, safe whelping box for under $25. You can adjust the size as you need, but the steps would be the same. (Don’t forget, my girl is 24″ high and 90 lbs. before pregnancy!) Brief instructions are in the captions of each photo, as necessary.


The moral of the tail
The moral here is, just like everything else here at APupStop, use your smarts! Use your imagination and do the research, but do not buy into everything you come across. Just because someone is promoting something does not mean that is what you definitely need. In fact, most of the stuff I needed we already had around the house.
Especially when it comes to the cost and risks involved with breeding quality pups, do your homework!
Pingback: So, What Happened? – A Pup Stop
Hi. I would like to try this for my girl. She will be ready in about a week. I have seen other welping boxes with guides so that the puppy does not get smothered. Did you add anything to the box for this? I’ve seen people use pvc so thinking you could just create a smaller version for the sides.
Hello Jasmine! Congrats on the up-coming litter! You may share some photos, if you like when they’re born 🙂 I suppose this whelping box could be modified to accommodate the guides you mention on the sides. Since the main part of this one is a tarp, it’s quite flexible. So I don’t see any dangers of a pup getting caught against a side and smothered easily. But if you cut the corner pieces in two parts and add another connector at each corner, then another 3 inch peice, then another long/side piece. It would make like a little shelf. Make sense? That might help make it more to the design you’re talking about. Hope that helps! Feel free to holler back with any more questions.